Low Back Pain from Prolonged Sitting

Lower Crossed Syndrome
So many of us are sitting for a living. We sit at our desks and we work, more or less, all day long that way. Then we sit while we drive home or commute and, once home, we sit some more.
See if this describes you:
After a full day’s work, albeit mostly spent sitting, you are tired. Your back hurts from trying to hold yourself upright all day. And the thought of going out for a long walk sounds exhausting.
When you do get motivated and get some exercise in, your lower back begins to ache. Your hips sometimes ache or just feel tight and uncomfortable.
You may notice a loss in range of motion in the hips and in your stride. You find that you need to take it slow or you feel something pull too tightly.
Noticing that things aren’t feeling like they should, you try some stretching of various muscles. But the stretches are not making a lasting impact. You feel weaker and the low back hurts more and more often.
Sometimes you wake up in the morning and feel worse than when you laid down. Something is tweaked.
Or maybe doing that home project landed you in bed for a day or two.
Something is not right.
You notice your posture is getting worse. Your stomach muscles are weak. It’s getting harder to stand up straight and not be in pain.
Over time, you may have developed something called Lower Crossed Syndrome.
What is Lower Crossed Syndrome?
It’s when you have a line of tight muscles - overworked, over stressed and tense muscles. And a line of weak and unengaged muscles. These lines invisibly cross one another in the body and, hence, the name: Lower Crossed Syndrome.
What are the symptoms of Lower Crossed Syndrome?
- The most common symptoms of LCS (Lowered Cross Syndrome) are:
- Arched lower back. Your spine arches forward and the stomach is pushed forward.
- Pain and/or tightness in your lower back muscles.
- Pain or tightness in the hips.
- Rotation of the hips, stressing them; this can lead to hyperextension of the knee (causing knee pain).
These initial symptoms and effects can have secondary effects, such as:
- Ache or burning in the shoulders.
- Pins and needles in the hands and/or arms.
- Tension headaches or migraine-like headaches.
As you can see, a cascade of effects can occur. You may not have all of these symptoms - hopefully you don’t!
What causes Lower Crossed Syndrome?
Sitting
The main culprit of lower crossed syndrome is prolonged sitting accompanied by poor posture.
There are several health risks associated with prolonged sitting, particularly if you do not do moderate activity for over an hour each day to compensate:
- Obesity, poor posture, increased blood pressure, high blood sugar, excess body fat around the waist, diabetes, and abnormal cholesterol levels are all correlated with daily, prolonged sitting.
- Add in poor posture - which can happen easily for those who sit for long periods of time - and musculoskeletal problems can develop.
Lack of Exercise
The second main cause of lower crossed syndrome is inadequate physical activity. Apart from regular movement and the strengthening that happens during exercise, certain muscles weaken and others tighten.
Poor Form or Unbalanced Focus During Strength Training
A less frequent but common cause of lower crossed syndrome is poor technique during strength training. For example, excessive arching of the lower back during yoga poses, pilates, squats or deadlifts can lead to injury and pain.
Sometimes an athlete may forget to focus on strengthening the abs and glutes as they favor other areas. And some sports tend to strengthen some muscles and not others.
Proper form, technique, and a balanced focus during strength training and exercise is important to avoid lower crossed syndrome.
SYNDROME?
A condition with the word “syndrome” in it never sounds good, does it? The term syndrome indicates that a collection of symptoms occur together.
In this case, the symptoms are self-perpetuating. They reinforce one another. For this reason, Lower Crossed Syndrome demands our focused effort and attention to get things working properly again.
But you can do this.
You can learn what is going on in your body - you are doing that now - and you can learn how to address it. This process won’t be quick and easy. It took a while for this situation to develop and so it will demand your sustained effort to undo it and build your strength again.
But, you are not resigned to decades of low back pain!
Your body possesses an amazing capacity to heal and strengthen.
At Daniels Chiropractic we are here to assist you on your road to recovery. We help people get better. Our commitment is to help you feel, move, and live better.
How does Lower Crossed Syndrome work?
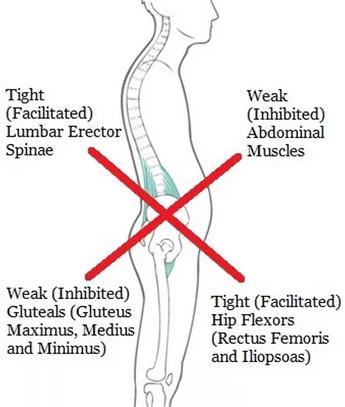
The lower back muscles and hip flexors become tight, overworked and shortened. The abdominals and glutes (buttock muscles) become weakened and lengthened. This pairing of tight muscles and weak muscles reinforces each other's dysfunction.
The Result?
The first result is an imbalanced posture:
The lower back arches much more than it should normally.
You can observe this extra arching while watching someone from the side. Or look in the mirror and observe your own posture.
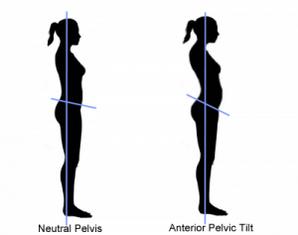
At the neutral position (the correct posture) the pelvis has a slight tilt forward. This is normal and good. In Lower Crossed Syndrome there is an excessive forward tilting of the pelvis.
Technically speaking, the pelvis rotates forward (anterior pelvic tilt) and the lower back is excessively arched (called hyper lordosis).
Also, in some people the hips may rotate outward such that the thighs open out a bit. This is called external rotation of the hip and it is due to weakness in the gluteus medius muscle.
The above describes what happens in the posture of someone suffering from lower crossed syndrome. Early on someone can have a posture imbalance and no pain. Many will develop pain at some point, though.
Now, let’s talk in detail about the second result: a muscle imbalance.
A muscle imbalance occurs when some muscles are tight, overworked and short. And some are weak and inactive.
We need to understand what is tight and short and what is weak and long.
In Lower Crossed Syndrome, the hip flexors, the muscles that move your legs forward and backward and side to side, are excessively tight and short, probably from sitting for extended periods. The hip flexor muscles are the iliopsoas and the rectus femoris. These guys are responsible for moving the legs back and forth when walking, running, and going upstairs. They control the swing of the leg back and forth.
If they are tight they pull on the pelvis and lower vertebrae. As they are shortened, there is less range of motion for the hips and legs as well. The low back muscles (lumbar region) along the spine, called the erector spinae, are also exceedingly tight and short in LCS. They are working too hard and are easily taxed.
Which muscles are weak in Lower Crossed Syndrome? The gluteus muscles (buttock region) are weak and aren’t engaged like they should be. And the abdominals (stomach muscles) are weak, lengthened, and allow the stomach to bulge out. You may even experience a pseudo-hernia condition from weakened abdominals. The weakness in the abs and glutes leaves the back muscles and hip flexors to do the stabilizing and motion work and they are already taxed and tired. It’s a bad setup.
What happens? Lower back pain.
If you add in a condition that is quite common - weak core muscles - the pain becomes chronic low back pain.
Are you beginning to see how this is a merry go round that doesn’t want to stop on its own. The bad in one area reinforces the bad in the other area.

There is another danger lurking as well. The stress on the lower spinal joints can lead to early degeneration of those joints. That damage is tough to turn around.
Now that you know the bad news, here’s some good news:
Chronic low back pain due to LCS does not have to be a permanent condition for you!
You can change the habits that led to this situation. You can relax and stretch the tight muscles and THEN learn how to safely strengthen the weak muscles. Daniels Chiropractic has developed a plan to correct Lower Crossed Syndrome and the resulting low back pain.
Let’s look at the first step in the plan: foam roller release and gentle stretches for the tight, short muscles. It’s critical that you release and gently stretch the tight areas first before trying to strengthen the weak areas. Stretching and foam rolling helps alleviate pain and discomfort associated with LCS. It also prepares the body to be strengthened where it is weak.
Foam Roller Release
Using a foam roller to release the tight hip flexors will jump start you on the road to recovery.
If you suspect that you have been experiencing LCS for a while then the hip flexors will not stretch easily. They need to be released from their very tight condition through the pressure experienced in foam rolling.
Place the foam roller on the ground and lower your right mid-section onto it. Stabilize your body by touching the ground with your hands and feet but try to put much of your weight on the roller itself. Roll or move your torso forward and backward from just above the waist down to the upper thigh.
Find the most uncomfortable spots and stay there for 10 seconds, taking three deep breaths. There will be discomfort. Wait till the muscle seems to somewhat relax. Breathe deeply.
Move the roller again, find another sore spot, and breathe deeply 3 times. Repeat this throughout the front hip and upper thigh region. You may also find very sensitive and sore spots as you roll closer to the hips and lean into them to create pressure.
Take your time with the foam roller. Moving quickly through this will gain you nothing. The benefit is in staying on the tender muscle long enough to force it to release and relax. Tight muscles will need several sessions (over several days) on the foam roller before they fully release. Each time there is improvement.
Switch to the left side and go slowly despite the soreness. You are doing your body a great service! Foam rolling can be practiced weekly once you have spent several days in a row getting tight places released.
Now you are ready to stretch gently.
Gentle Stretches
First thing in the morning do some basic lower back stretches before you get moving. You can do these first two on the bed or on the floor after waking to help release and activate tight muscles.
Supine Pelvic Tilt
Lie on your back with the knees bent and the soles of the feet on the floor. Gently rock your hips towards the ceiling and let your back fully touch the floor. Tighten your abdominal muscles (bracing or engaging the abs) and move the small of the back towards the floor. The lower pelvis tilts up slightly. Your butt will not actually leave the floor, but you will feel your low back press into the floor. Hold for 10 seconds. Repeat 10 times.
A few pointers: Rest your arms by your side. While keeping your feet flat on the floor, you can also press the heels into the floor to protect the hamstrings from cramping. Relax your shoulders and neck and remember to breathe throughout the exercise.
Controlled Rotations
After pelvic tilts, remain on the back and keep feet together. Rock and rotate the pelvis over to the right side by bringing the knees to one side and gently back to the other, keeping the shoulders on the mat and feet together. Hold for 5 seconds on each side, pausing in the starting position. Do 10 reps twice a day.
Hip Flexor Stretch
Place your left knee on the floor (use a pillow for comfort) and your right leg at a 90-degree angle in front of you, hips aligned straight ahead. Now, place a hand on a stable chair/couch or nearby wall for stability. Tighten the glutes, straighten the back, and pull in the pelvis so that your back is NOT arched. Lean forward into your right hip. Hold for 30 seconds. Repeat on each side 3 X.
For deeper stretching of the hip flexors (iliopsoas and rectus femoris):
- Move the planted foot out to 2 o’clock and then 10 o’clock and repeat the stretch gently, leaning into the angled knee.
- Now, return to 12 o’clock with the planted foot. Lean forward into the stretch. Raise the arm of the side of the knee on the ground. Reach to the ceiling gently.
- Return again to upright position, planted foot at 12 o’clock, opposite knee pressing into the floor. Lean forward again till you feel a gentle stretch. Then pivot at the waist and lean back only slightly. Be careful to keep your back straight and your pelvis tucked under and glutes tight in order to protect your back. Slightly leaning back at the waist will activate and stretch the rectus femoris muscle down the front of the thigh.
Quadratus Lumborum (deep back muscles) Stretch
From Standing
Stand with your feet shoulder distance apart and your left hand on your waist. Reach overhead with your right arm and lean toward your left side. Hold for 30 seconds.
From Sitting
Sit cross-legged. Place the left hand across the waist to the opposite side, as if holding the right waist area. Raise right arm and stretch over to the opposite side (left side) gently holding for 30 seconds.
From Supine (lying on the back)
Lay down on your back with knees bent and feet flat on the floor, hip width apart. To stretch the right side: Drop knees to left side while upper body is as flat as possible on the mat. Take your left knee and hook it on top of the right knee while the legs are still dropped to the left side for a deeper stretch. Do the opposite to stretch the left quadratus lumborum (deep back muscles).
Lower Back Cat and Camel Stretch
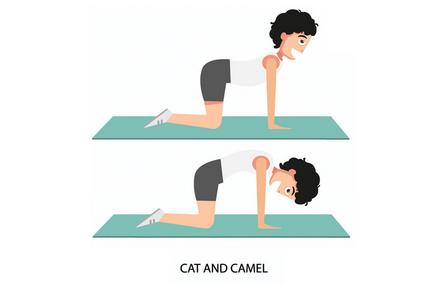
Get on the hands and knees with the back straight and hands and knees hip width apart. Arch the back upwards like a cat by tucking the bottom under and placing the chin toward the chest. Gently extend the spine and drop back downwards, looking forward with the head. Breathe deeply. Bring bottom back over feet. Repeat 10-20 times.
Child’s Pose
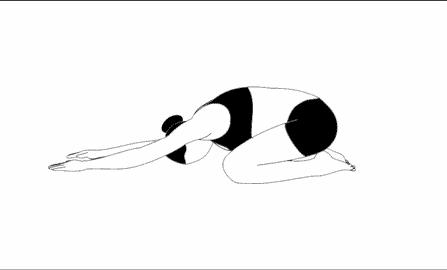
This yoga pose passively stretches the back muscles (lumbar erector spinae).
Kneel down and sit back on your feet. Lower your upper body down towards the floor and over the knees/legs. If able, extend your hands out in front of you resting on the floor. Now gently rest your forehead on the floor in front of you and allow your back to relax. Breathe deeply 10 times.
Back Stretch
Lie on the back with legs stretched out. Bring knees to the chest and hold onto knees/shins with hands, pulling gently toward the chest. Hold for 20 seconds or 8 deep breaths. Release and repeat.
If you are concerned that you are extremely tight, do these stretches slowly and gently for 3 to 5 days. Then add in strengthening exercises below.
Strengthening
Now it’s time to incorporate strengthening into the routine.
Standing Posterior Pelvic Tilt
This exercise trains and strengthens the pelvic muscles. Stand tall with feet shoulder width apart. Hold pelvic tilt by squeezing the glutes and kegels and pull the bottom of the pelvis forward. Hold for 20 seconds. Release and repeat.
Try to repeat this hold throughout the day at 10-20% intensity to strengthen the endurance of the core muscles. You should be able to talk, belly breath, walk and perform any major motion under this tension.
Glute Bridge
Lie on back with bent knees hip distance apart, and feet flat on mat stacked under the knees. Cross the arms over the chest or leave at your sides. Engage the core - keep trying to pull your bellybutton into your spine at 20% effort. Remember to breathe and squeeze your glutes (buttocks) tight as you lift your hips and then lift your back up to a bridge. Focus on pushing your heels into the floor and lifting your hips first, then the back. Do not arch your spine at all. Hold for 10 seconds. Return the back, then hips, slowly to the floor. Do 10 reps.
The RKC Plank
The RKC Plank does a better job of activating deep core muscles by calling on the glutes to tighten as well as the abdominals in this particular position.
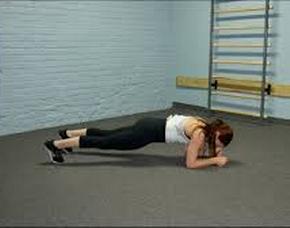
To properly execute this plank:
- Lie face down on the floor and prop your torso up on your forearms so that your shoulders are directly above your elbows. Interlock the hands or clench the fists while they are close together. Move the feet out, slightly wider than normal.
- Activate your abdominals by consciously attempting to draw your belly button towards your spine (in the upwards direction).
- Then, posteriorly pelvic tilt your hips by squeezing your glutes and continue to keep them contracted as you hold the plank. Again, the pelvis is posteriorly rotated as opposed to neutral (which is usually not able to be maintained) in the traditional plank.
- Tighten every single muscle. To increase tension focus on pulling your torso toward your feet and your feet toward your torso.
- Hold this position for 5-10 seconds. Do 2-4 sets and rest for 30-45 seconds between sets.
Side-Lying Straight Leg Raise - Hip Abduction Exercise
Target and strengthen the gluteus medius by lying on one side, flexing the toes, and bending the bottom leg slightly behind you. Now straighten and lift the top leg while the toes remain pointed forward at all times. The leg will move up and slightly behind the hip. Hold in your abs and do not rock forward or backward over the hips.
You should feel this stretch on your glutes. Move slowly and hold at the top for 3 seconds and bring down slowly. Work up to 10 reps on each leg.
Bird Dog Arm & Leg Extension
Extend one leg and the opposing arm simultaneously away from the body (e.g. the right arm and left leg). Hold the extension for 5 seconds and then change to the other side. Do this in a controlled, slow manner, not swinging or shifting weight. Maintain a neutral spine throughout the exercise. Do 3 sets of 10 reps on each side. Rest for 30-45 seconds between sets.
Habits to Form and Keep
Posture
Work on maintaining good posture while sitting. Gently activate lower abs and sit up straight, shoulders back. Feet flat on the floor in front of you.
Using an inflated pillow such as this can help stabilize and support the back while sitting.
The best advice for prolonged sitting and maintaining posture is to stand and move around every 15 minutes. It can be difficult to form this habit so set an alarm to train yourself.
Sleeping Position
Sleeping on your back with a pillow under the knees will distribute the weight evenly. Use a low pillow if sleeping on your back.
If you prefer to sleep on your side, place a pillow between the knees for lower back and hip alignment.
No matter what, do not curl up into a fetal position. This may feel good if you have short hip flexors and weak abs (LCS) but it reinforces the weakness or tightness in the muscles. You can wake in a worse state than when you went to sleep!
At Home Treatment For Pain
When you feel particularly uncomfortable use heat on tight muscles (the lower back and flexors) and cold on the weak muscles (the abs and glutes) to activate them.
Come See Us
Undoing the condition of LCS takes time, sustained effort, and self-discipline. It also can be greatly helped by the treatment we provide at Daniels Chiropractic.
Chiropractic care can relieve the pain and immobility in these areas by helping release the tight muscles and by restoring proper movement to the joints.
You don’t need to live with restrictions, immobility, and pain. Our aim is to restore joint mobility and neuromuscular control so that you can experience increased flexibility and effectiveness in stretching and strengthening at home.
Come see us at Daniels Chiropractic and let us help you get better. We want to help you feel, move, and live better!
Daniels Chiropractic Office
2609 Rapids Drive
Racine, WI 53404
Phone: 262.638.9999
Fax: 262.638.0742
Images:
- https://www.technogym.com/gb/newsroom/lower-back-pain-the-public-enemy-n...
- https://rehabrenegade.com/why-glute-bridges-arent-fixing-your-back-pain/
- https://www.kaleishafetters.com/rkc-plank/
- https://www.physicaltherapyfirst.com/mobile-hip-abduction-sidelying/
- https://us.humankinetics.com/blogs/excerpt/foam-rolling-the-hip-flexor-g...
- https://truenaturetravels.com/uncategorized/stretches-for-lower-back-pain/
Sources:
This article produced with the help of the Chiropractic Success Academy.