Get Ready to Golf Again: Exercises to Prevent Injury

Are you feeling like you may be a little rusty as you head out for your first round of golf this year? It’s certainly been a while since most of us have gone golfing.
At Daniels Chiropractic in Racine, Caledonia, and Mt Pleasant, we want to help you prevent injury and stay well as you get back out there on the golf course this summer.
Work From Home?
Maybe you’ve been sitting a lot while working from home. And sitting a lot while staying safe at home.
If that describes your past few months, then it’s likely that your glutes are weakened, your hip flexor muscles have shortened, and your back is tight.
And yet what will you need for a good golf swing? Hip mobility. Upper body flexibility. Strength in the glutes and abs.
Also, if you work at a computer for long stretches you may tend to round over in the back and fall into poor posture. This moves the upper spine and neck out of their natural curve which can hinder the healthy rotation you’ll need in the upper body.
In order to avoid getting hurt on your first outing, take your body through the following regimen before you start swinging your clubs again.
It’d be a shame to FINALLY get out of the house and on the links, only to come home injured and in recovery for a month.
So, let’s focus on …
Rotation Preparation
It’s tough to overstate the importance of a healthy, flexible, and strong rotation to the golf swing.
Your strength and precision determine ball speed and distance. But, your flexibility is what keeps your swing in fluid motion and lets you access all of the power stored up in those muscles.
Let’s stretch and strengthen your body to get you ready for your best game yet.
Stretch and Strengthen At Home
Getting good rotation is all about using your legs, core, and your shoulders to coil and uncoil during your swing. To get ready to play golf again - both to stretch and strengthen your body - we recommend these exercises in the following five areas:
- Core
- Glutes
- Upper Body
- Lower Body
- Upper and Lower Body Separation
The bonus is that you can do all of these at home! No need for a gym or fancy equipment. You will only need access to a pillow cushion, a chair, and a door frame. Not too hard to find at home.
Try these exercises daily over the next 3 weeks, following the designation of week 1, week 2, and week 3 for each category. Alternatively, you can combine or mix and match as you desire. Just be sure you are doing something from each category.
Core
For Stability and Strength:
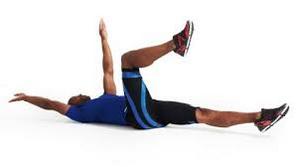
Week 1: Dead Bugs. Lie on the back and put your arms up in the air. Lift legs up, knees bent at 90 degree angle. Extend the opposite arm and leg parallel to the floor slowly, steadily, and bring the knees together at 90 degrees and the arms straight up. Switch to the opposite arm and leg. Do 3 sets of 10-20 reps.
Week 2: Forearm Plank on Knees. Get into a side plank position on the floor. This will be on your side, keeping a straight line between the torso, hips, and head; up on one elbow and one knee, with knees stacked. Hand on hip. Hold for 10-20 seconds. Do 3 sets of 10-20 reps.
Week 3: Curl Up. Lay on back with one leg bent and one leg straight on the floor. Place hands under your lower back and elevate the elbows off of the ground a bit. Now, lift the head and shoulders off the ground (keeping them aligned together and only lifting a few inches). Hold for 1-2 seconds and return to the ground. Do 3 sets of 10-20 reps.
Glutes
For Stability and Strength:
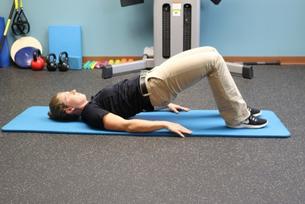
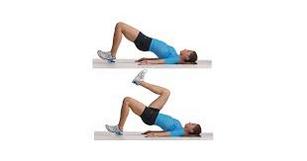
Week 1: Glute Bridge: Lie on your back, bent knees, feet flat on floor near the glutes, arms at sides or crossed on the chest. Lift the hips in line with knees and head, tightening the glutes (think of a credit card between the cheeks!) and pressing the heels in so that the hamstrings don’t do all the work. Do 3 sets of 10-20 reps.
Clam Shell
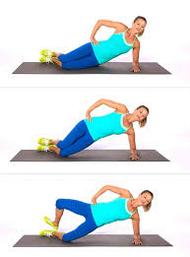
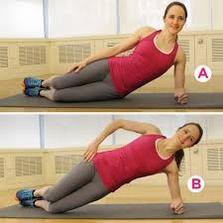
Clam Shell in Plank Position
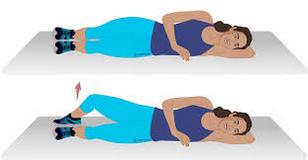
Week 2: Clam Shell. Do this exercise on the side or in a side plank up on the knee. Keep the hips lined up with a straight line from spine to head and with one arm bent with that elbow on the ground. If in a plank, have one arm bent on the floor and one hand on hip. Open upper knee, keeping feet together; move slowly. Do 3 sets of 10-20 reps each side.
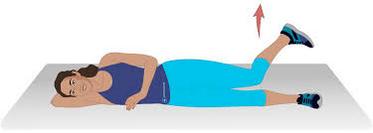
Week 3: Glute Bridge March. Position yourself into a glute bridge as in week 1 above. Lift one knee up and hold for 1-2 seconds. Activate abs and glutes, pushing through the heels, while lifting one bent knee at a time. Keep hips as steady as possible. Do 3 sets of 10-20 reps.
Upper Body
To Stretch and Strengthen Rotation:
Week 1: Open Book. This stretch will open up the rib cage and stretch the back. Lay on the side (on hips) with the bottom leg straight and your top leg bent at 90 degree angle. Place the knee on a pillow in front of you for comfort, always applying pressure toward the knee on the pillow on the ground. Stack straight arms on top of each other in front of your torso. Open up the torso, moving the top arm to the opposite side. Do 3 sets of 10-20 reps on each side. Try to get your shoulder to reach the ground on the other side.
Week 2: Half Kneeling Torso Turns. Get down on the knees and put one knee up so that you are down on one knee. Place a cushion under the knee on the floor. Keep hips as stable as possible, cross arms on chest, and twist the entire upper body slowly and as far as possible, rotating toward the knee that is up. Return. Feel a deep stretch in the mid and upper back. Do 3 sets of 10-20 reps.
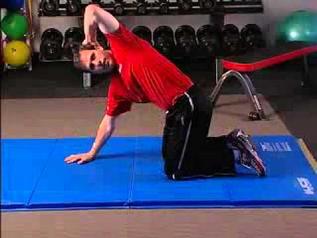
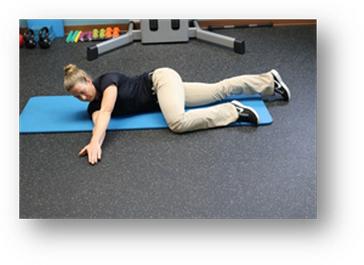
Week 3: Reach Backs. Get on all fours. Keep abs activated and spine in neutral (not swayed or excessively arched). Place the left hand behind the head and rotate the body toward that elbow as far as you can. Keep lower back in place, concentrating on rotating only the upper back. Return and repeat. Do 3 sets of 10-20 reps on each side.
Lower Body
To stretch and strengthen the hip flexors.
Week 1: Active Figure Four Hip Stretch. Lay on back, bend knees, feet flat on ground near bottom, Place right ankle on left knee, then push right knee out towards the ground and feel a deep stretch to hip and glutes. Do 3 sets of 10-20 reps at 20 seconds each.
Week 2: Windshield Wiper With One Leg. Sit on the ground on your bottom, knees bent and feet on the floor, spread wider than hips, and with your hands placed behind you on the floor for support. Lift a toe off the floor, flexing that foot. Bring that knee in toward the opposite knee, reaching for the ground. Only go until you feel a deep stretch in the hip. Keep your foot flexed and stop if the knee hurts. Try to go a little deeper each time but go slowly and gently, stopping if there is any knee pain. Do 3 sets of 10-20 reps.
Week 3: Reverse Clams. This gives a deep stretch in your hip and also strengthens the hip flexors. Lay on the ground on one side. Bring knees forward together at 90 degree angle and place cushion between knees for comfort. Flex the foot on top, keeping knees together, and rotate the foot up toward the sky as able, and return. Do 3 sets of 10-20 reps.
Upper and Lower Body Separation
These teach your upper body to move separately from the lower body.
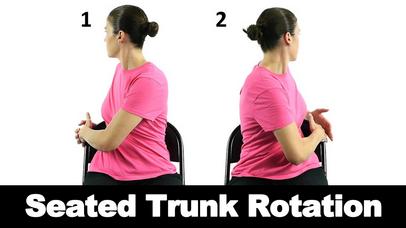
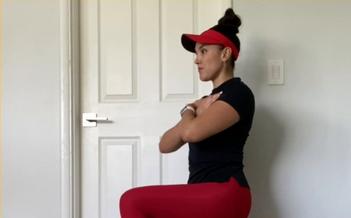
Week 1: Seated Torso Rotation. Sit in a sturdy, heavy stool or chair, place a cushion or pillow between your knees, and press knees together. Place hands on chest or keep bent near waist. Twist the torso to the right and back to the left slowly while pressing knees together. Repeat 20 times, aiming for a deeper stretch each time while holding the lower body as stable as possible.
Week 2: Resisted Pelvic Rotations. This exercise helps the hips to move in order to initiate the downswing with the hips. Stand by a door frame for support, perpendicular to the door, and hold the frame with one arm. Inch forward along the wall till you feel a stretch in arm and upper body. Stand with feet “hips width” apart and knees bent. Holding onto the frame is your anchor. Other hand can be on the chest. Twist only at the hips away from the wall. Hips rotate in the opposite direction from the wall slightly. Keep the upper body as stable as possible. Do 3 sets of 10-20 reps.
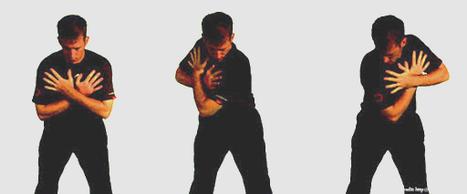
Week 3: Standing Torso Rotations. Stand in golf posture, knees bent, feet apart, slightly bent over, with arms crossed and at chest. Keep the hips stable and rotate the torso as far to the right as possible, hold one second, and then to the left as far as possible, and return. Do this in front of a mirror to check that you are not turning your hips at all. Do 3 sets of 20 reps, alternating sides.
Also add in some of these exercises as a warm up right before you go out to golf.
Here’s to a great golf season. Stay stretched, strengthened, and healthy!
Come See Us
If you are in pain and need help, come see us. At Daniels Chiropractic our mission is to help you feel, move, and live better.
Give us a call at 262-638-9999.
Daniels Chiropractic Office
2609 Rapids Drive
Racine, WI 53404
Phone: 262.638.9999
Fax: 262.638.0742
Sources:
- https://www.youtube.com/watch?v=GdPAhi082XI
- https://www.popsugar.com/fitness/photo-gallery/7102627/image/7102638/Glute-Bridge-Marching
- https://www.popsugar.com/fitness/How-Do-Plank-Clamshell-45630716
- https://www.womenshealthmag.com/health/a20700486/knee-side-planks/
- https://www.coachmag.co.uk/abs-workouts/6384/the-dead-bug-exercise
- https://www.youtube.com/watch?v=fBQ1nMmf3b0